
 hen,
or if, we think of weatherstripping, it usually is to seal out the ravages of
Mother Nature. But for those of us with a Corvette sporting air conditioning, it
seals in the cool in hot weather as well as the heat during winter. These rubber
pieces also act as insulators between flexible body parts, and we all know how
much a vintage Corvette body can twist and flex in daily use. All in all, these
little pieces of rubber provide a very valuable service for you and your car.
hen,
or if, we think of weatherstripping, it usually is to seal out the ravages of
Mother Nature. But for those of us with a Corvette sporting air conditioning, it
seals in the cool in hot weather as well as the heat during winter. These rubber
pieces also act as insulators between flexible body parts, and we all know how
much a vintage Corvette body can twist and flex in daily use. All in all, these
little pieces of rubber provide a very valuable service for you and your car.
Replacing all the weatherstripping in the 1969-'77 Corvette is relatively easy, requiring no special tools. All the necessary replacement items are available in reproduction. Why are you not surprised? All the rubber we are using here is from Mid America Designs, and the fit and finish of each piece is exceptional. Every item was perfectly formed to fit into the factory retaining channels, and the complete job went along without a hitch. We will provide, however, several tips that will make the job a lot easier and save you some unnecessary frustration.
Tools and supplies will include both narrow and wide blade putty knives, a Phillips head screwdriver (electric if available), a wide blade flat screwdriver, weatherstripping cement, a can of 3M adhesive remover (available in any auto paint supply), some 3M masking tape or equivalent, chrome polish, some cleaners (409 or Simple Green), a stiff bristle brush and the desire to work on your Corvette.
We accomplished the complete task at a leisurely pace over two weekends in order to clean parts and take the time necessary to ensure a good job. After each piece is fixed in place, the item (door, T-top, etc.) should be installed or closed overnight to set the shape of the rubber and allow the adhesive to completely set up. You will immediately notice how much quieter it is inside the car and how many squeaks and rattles you once took for granted have gone away. If you enjoyed driving your Corvette before, just wait until you super seal it up!
Here are the Mid America part numbers of the rubber items necessary to seal your Corvette: T-top rubber (WS4071 pair), door insulator (WS4035/4036), rear side window rubber (WS4051 pair) and windshield pillar post rubber (WS4055 pair).
Our original door corners were worn and flaking apart from a quarter century of use. At this point they are no longer functioning and must be replaced.
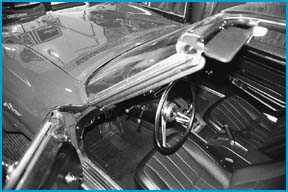
 The junction of the T-top to the windshield pillar takes a lot of
punishment. Constant window glass movement and T-top use quickly destroy this
area. Check your car at this point - it probably shows deterioration.
The junction of the T-top to the windshield pillar takes a lot of
punishment. Constant window glass movement and T-top use quickly destroy this
area. Check your car at this point - it probably shows deterioration.
Prior to starting each area of the job, it is always a good idea to trial fit each piece. This will familiarize you with the shape and installation of the original and how the new piece will be installed. Inspect each piece, form a plan and go for it.
In order to get at a pesky pop rivet securing the bottom of the small side glass rubber, you will have to remove the plastic side trim and overhead trim. It takes a few minutes to remove the Phillips screws and take them out. Use your cleaners and bristle brush to scrub the years of dirt from these items before reinstallation. It's worth the effort!
We used a 1/8-inch drill to remove the factory rivet. To re-secure the new rubber at this point, we used a short 1/4-inch fine thread bolt and nut and washer on the back side. Neither is visible when the rubber and trim are installed.
Using a flat blade screwdriver, carefully pry out the old rubber from the metal channel. Once the rubber is removed, scrape off all the old adhesive and wipe the area down with 3M adhesive remover. A clean surface will provide better adhesion for the new rubber.
We placed a few thin strips of adhesive in the channel and allowed a few minutes before installing the rubber. It is a good idea to touch the rubber to the glue and pull it away slightly before final contact. Be careful not to pull the rubber too far up or spider web like strings of glue might sneak out where you don't want them.
 There are formed channels in the metal where corresponding rubber
shapes will fit. Careful inspection will show the correct installation. We
pushed the rear corner against the car and used the small putty knife to push
the formed rubber rib into the metal channel. It's self explanatory as soon as
you see it in person.
There are formed channels in the metal where corresponding rubber
shapes will fit. Careful inspection will show the correct installation. We
pushed the rear corner against the car and used the small putty knife to push
the formed rubber rib into the metal channel. It's self explanatory as soon as
you see it in person.
The top of the rubber tucks under the chrome trim piece at the top of the channel. Once installed, the rubber will stick in place securely within a few minutes and you can proceed to reinstalling the plastic trim panels. Clean all the chrome screw heads with a brush before installation so they will look factory new when the job is done.
The windshield pillar post rubber is secured at the top of the metal channel with a Phillips head screw. Remove it. You may have to dig down into the old rubber to find the screw head, but it's there.
 At the bottom of the pillar rubber is the water diversion channel
rubber in the door jamb. This rubber is not part of the pillar post replacement
and if it's in good shape, it can be reused. If not, it must be ordered with the
other pieces. This hard rubber item was still intact on this car, so we are
reusing it. Three Phillips screws hold it in place.
At the bottom of the pillar rubber is the water diversion channel
rubber in the door jamb. This rubber is not part of the pillar post replacement
and if it's in good shape, it can be reused. If not, it must be ordered with the
other pieces. This hard rubber item was still intact on this car, so we are
reusing it. Three Phillips screws hold it in place.
The rubber can now be slowly pulled out of the metal channel. Very little weatherstripping cement was used at the factory - follow this example during reinstallation.
The old pillar post rubber is falling apart and the wire reinforcing is literally popping out. You will notice the new rubber is puffy and soft. This will provide a good seal without having to slam the door hard to shut it.
The top edges of the pillar post rubber align perfectly with the chrome trim at the corner. A couple of pieces of masking tape will keep this area properly aligned until the cement sets up. The small putty knife will come in handy to push the formed rubber into the channel.
In order to install the door weatherstripping, the door panels must be removed. Two Phillips screws in the grab handle, two at the top corners of the panel, pop off the C- clips holding the door lock and window crank, two metal straps with screws at each lower corner on the door jamb and you can pull the panel free of its Velcro-like connectors. This panel was dated May 25, 1971. Our car was built on June 17, 1971.
The door rubber is secured at the rear corner by one Phillips screw. There are two more at the front edge that must be removed.
 Under the door lip at the rear jamb are two more sneaky screws that
need to come out. These secure a metal plate formed into the rubber that
correctly positions the rubber and firmly secures it at this sealing point. We
slowly peeled back the old rubber with the assistance of the small putty knife.
Again the factory only used a thin bead of cement which is easily defeated.
Slowly peel the rubber down the length of the jamb and under the door.
Under the door lip at the rear jamb are two more sneaky screws that
need to come out. These secure a metal plate formed into the rubber that
correctly positions the rubber and firmly secures it at this sealing point. We
slowly peeled back the old rubber with the assistance of the small putty knife.
Again the factory only used a thin bead of cement which is easily defeated.
Slowly peel the rubber down the length of the jamb and under the door.
The new replacement rubber is one continuous piece (on the outside). The original rubber was two separate pieces as shown on the inside. Our original pieces came apart at the end caps during removal.
This is the 3M wax and adhesive remover No. 08984 necessary to completely clean the old adhesive away. After scraping the heavy stuff with the putty knife, a rub down with this will normally take off the residue left over.
We placed a thin bead of the black adhesive in the area where the door edge meets the jamb (as original) and carefully positioned the new rubber. To make sure it doesn't move until the adhesive is set, we used some tape strips to secure it. You can do this completely around the door if you need to.
Our new door rubber fit like a glove. There is a flat area formed into one corner of the door weatherstripping that conforms to the shape of the door. We applied the adhesive in about 1-foot lengths, fitted and taped the rubber, then moved on until we went around the whole door.
We started at the front of the door near the windshield pillar and worked to the rear. As you move around the door, carefully stretch the rubber slightly and continually fit the small metal plate (with the two sneaky screws) so when you get to this area the plate will be in the correct position.
On each side of the T-top is a small metal strap secured with a Phillips screw. Remove both screws and the interior padded trim can be lifted free of the top. Work on a table with padding under the top to prevent scratching the paint.
Like the door panels, the T-top pad is attached with these Velcro-like snap pads. There are several around the circumference of the pad, so move slowly, unsnapping as you go. The pad can now be cleaned with your detergent and brush before reinstallation.
Along the outside edge where the top of the side glass fits the weatherstripping on the T-top, the old rubber can be pried out of the metal channel with your small putty knife. Again, there are formed slots in the rubber and metal which correspond for a tight fit.
 Plastic pins that fit into holes in the T-top hold the thin rubber
that travels around the T-top sealing it to the metal T-bar of the car. You can
carefully pull the old rubber from these pins while leaving them in the holes.
Be careful not to break them off, or the pieces will rattle around inside the
top. Carefully twist out the plastic pins with a pair of pliers, removing them
in one piece.
Plastic pins that fit into holes in the T-top hold the thin rubber
that travels around the T-top sealing it to the metal T-bar of the car. You can
carefully pull the old rubber from these pins while leaving them in the holes.
Be careful not to break them off, or the pieces will rattle around inside the
top. Carefully twist out the plastic pins with a pair of pliers, removing them
in one piece.
After cleaning any glue residue left from the original rubber, we masked off the chrome plated locating pins, and after scuffing the surface of the fiberglass with a scotch pad, we shot a coat of semi-gloss black paint on the edges. We carefully masked off any areas of exterior color prior to adding the black. This really finished off the resto of the tops.
Using the wide blade putty knife, we installed the rubber in the metal channel. Move slowly and make sure the rubber is completely seated in the formed areas.
We installed a thin bead of cement for the thin rubber with the locating pins. Push each pin in securely as you move around the T-top, and you are done.
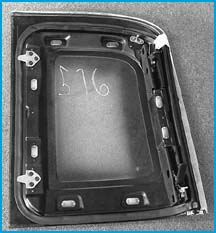 Here's the finished T-top with some tape securing one corner. Both
tops had 516, or May 16, written in chalk under the padding. We reinstalled the
pad and secured the top to the car overnight to set the glue and form the rubber
to the T-bar.
Here's the finished T-top with some tape securing one corner. Both
tops had 516, or May 16, written in chalk under the padding. We reinstalled the
pad and secured the top to the car overnight to set the glue and form the rubber
to the T-bar.
Source
Mid America Designs, Inc.
One Mid America
Place
Effingham, IL 62401
800-500-8388
Fax: 217-347-2952


Copyright(c) 1997: Dobbs Publishing Group.