

The two instruments that Corvette drivers pay the most attention to are the tachometer and the speedometer. The tachometer lets you know how the engine is performing. An inaccurate reading can lead to major problems such as rods and pistons exiting out of the side of the block. A speedometer that isn't working correctly can lead to an up-close and personal visit with a highway patrolman. Let's face it, neither of these two problems is an enjoyable experience.
The symptoms of tachometer problems are: a sticking needle, the tach will not register above a certain rpm, sometimes the tach works correctly and sometimes it doesn't, the needle does not return to zero when the ignition is turned on, the needle jumps radically or fluctuates, or the tach just does not work at all. The speedometer has similar symptoms: the needle fluctuates, sticks in one position, will not return to zero, will not register past a certain speed, reads slow or fast, the odometer does not register or it just does not work. All of the problems can be corrected by making one phone call to Zip Products. They can supply all of the needed parts to rebuild or replace your tachometer and speedometer.
Our Project 77's speedometer and tachometer both needed repairs. Since this was the case, we decided to do them both. You will not need any special tools to do the repair, but you will need patience. It should take the average home restorer a weekend to complete the project. If you have to repair or replace one of the instruments, it is a good idea to make sure you will not have to do the other one. The reason I say this is because you will have to take the entire dash and driver's instrument cluster out of the car, so you want to do this repair once, not again at a later date. Now let's get started!
Start by disconnecting the battery. Now remove all of the windshield garnish moldings. Remove the console side panels and loosen the center console gauge cluster. If your car has air conditioning, remove the driver's side lower A/C duct. Lie on the driver's side floor and look up behind the instrument cluster. Disconnect the tachometer and speedometer cables. Now disconnect all of the light sockets that you can reach.
Loosen the right lower dash cover retaining screws and carefully remove the dash from the car. The A/C duct, if so equipped, will also have to be removed.
The upper dash pad retaining screws should be removed. Now carefully remove the upper pad.
The steering column retaining nuts can now be removed. This will allow you to push the column down. Remove the left lower dash pad retaining screws and carefully pull the pad out away from the dash. Tilt the pad so that you can disconnect any sockets that you could not reach before. Push the steering column down and carefully remove the pad and cluster from the car.
Lay the lower dash face down and remove the tachometer metal back retaining screws. Mark the location of each screw because there are different lengths.
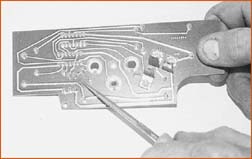
 With the
metal back removed, you will see the tachometer circuit board. The tachometer
became an electric instrument in 1975, and its function is controlled by this
circuit board. After 20-plus years, these boards have a tendency to go bad and
usually get hot and burn in one area. If you look closely in this picture, you
may be able to see a dark area. This is where our circuit board has burned,
which caused the tach to work erratically.
The new replacement board from Zip is smaller in size but does the same job as the original. If you want to keep your original tach, just replace the circuit board, which is good for both the L82 and L48. Since the face of our Project 77's tach was extremely faded, we decided to replace the whole unit. Our '77 has an L82 in it, but the only new tachometer that is available is for the L48. The only difference in the two tachs is the redline. The L48's is lower. Since the owner of our project Corvette shifts at over 6000 rpm most of the time, the redline didn't make much of a difference. If your car has the L82 and you want to keep it original, you will have to replace the circuit board and use the existing tach face. If it doesn't make any difference, you can purchase a complete new L48 tachometer.
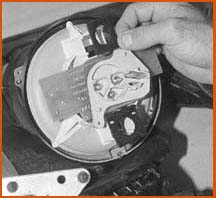
 When
replacing the circuit board, re-use all of the original nuts. They go on the
solder side of the board and the terminals are all marked. Make sure all of the
connections are made correctly. If they are reversed, the tach will burn out.
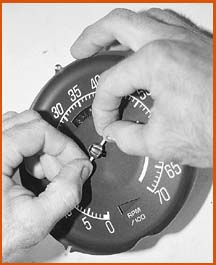
The tach needle will need to be re-zeroed on any '75 or '76 Corvette. If it is
not, it will read about 3000 rpm off. To do this, carefully remove the needle.
Set the tach up so you can apply 12 volts and a ground to the correct terminals
on the back of the tach. Apply 12 volts to the tach. Now re-install the needle
at 0. Carefully remove the 12-volt connections. Now the tach is zeroed. On 1977
models, there is no need to re-zero the tach, but if you reuse your old unit,
you may want to install a new needle. Carefully pull the old needle off using
your thumb and forefinger. Then install the new needle as per the instructions
for your year Corvette. Sometimes when removing the needle, the shaft will get
stuck and pull up. If this happens, push the shaft back in a little so it is
free, then re-install the needle. Note: The adjusting screw on the resistor is
not for zeroing the tach. Before re-installing the tachometer, you may want to
pre-test it. Connect the tach to the wiring harness. Make sure your three
connections are correct. + is 12 volts and - is negative, or ground and coil.
Re-connect your battery. Turn the key to the on position. The tach needle should
point to zero. If it does not, the problem could be in the distributor or the
wire coming from the distributor. You may also have the tach connection
reversed. Now disconnect the tach and battery and continue with the rebuild.
The speedo replacement is very simple. Remove the retaining screws. Again make a note of which one goes where and replace the entire speedometer. It is also a good idea to check the operation of the trip odometer reset cable. Lube the cable so its movement is free. Remember, in most Corvettes, this cable has a severe bend, and lubing it will help free its movement.
We wanted to freshen up our lens bezels, so we removed them. On disassembly you will notice these small rubber pads between the gauge lens and the bezel. These are small anti-rattle pads. They keep the lens from rattling against the bezel. To freshen up the black painted area on the bezels and housing, start by cleaning them. Now use 600-grit or a fine scuff pad to scuff the black painted surfaces. Do not remove the black paint. By leaving it and just scuffing it, you can use it as a primer base. Now take 1/8-inch masking tape and tape the chrome outer lip of the bezel. Spray the black surfaces with a semi-gloss black. When it is done, remove the tape. Now you have gauge bezels and housings that look new. If your bezels are beyond repair, contact Zip Products. They have new ones in stock.
Install the lens gasket, lens and anti-rattle pads onto the housing.
Now re-install the bezels into the lower dash assembly. Then place the lens and housing onto the bezels and tighten into place. Note: You will notice that we marked the bezels R and L. Even though they are the same, we wanted to re-install them into their original locations.
 Before
you re-install the metal backs onto the tach and speedometer, make sure you
replace the warning light socket gaskets. These are also available from Zip.
You can now re-install the speedometer and tachometer into their respective housings. Re-install the metal backs. Make sure that you put the metal speedometer cable retaining clip onto the speedometer shaft. Without this clip, the speedometer cable will not stay attached.
Connect and attach the trip odometer cable. Make sure it operates correctly before you move on. We also installed a new reset rubber knob on the trip odometer cable.
Here is our instrument cluster assembly ready for installation into the lower dash.
Lube the speedometer cable before you connect it to the speedometer. Sometimes an erratic speedometer can be attributed to a dry speedo cable. The cable can be pulled completely out of the housing and greased. Use either white grease or wheel bearing grease to lube it thoroughly.
With the lower dash cluster removed, replace all of the dash bulbs. These are a common auto parts store item and are readily available. The bulb number is located on the socket end. It is much easier to replace them now than when the dash cluster is re-installed. Trust me!
The instrument cluster and lower dash are now ready to be re-installed into the car.
Start the re-installation by tying the dash harness up as high as possible. This will allow you to slip the instrument cluster below it as you re-install it. Carefully lower the dash cluster into place. Remember to push the steering column down to help installation. Make sure that you get the lower dash pad behind the center console.
With the dash unit lying in place, connect all of the sockets and wiring that you can. Again, this is much easier than lying on your back working from under the dash. Also connect the speedometer cable.
When all of the connections are made on the driver's side, correctly place the lower dash and re-install the screws that secure it.
 Now
replace the upper dash pad, right lower dash pad, steering column and cover,
console side covers, all windshield garnish moldings and re-connect the battery.
Start the car and check the operation of all the gauges. Test drive the car and
check the speedometer. Also, do not forget to turn on the lights and check the
dash bulb connection. If you did everything right, you should be all set to go
for another 20 years!
Source
Zip Products
8067 Fast Lane
Mechanicsville, VA
23111
800-962-9632

