Vinyl ToDYEFor
Dyeing plastic and vinyl parts
text and
photography by Greg Donahue
A lot of new plastic or vinyl interior items that you purchase for
your Corvette do not come color-coded to the interior. Most times, these items
come in black or gray, and will have to be dyed to match your interior.
Sometimes, you may want to change the color of an existing item. There is no
secret to doing this - all you need are the right products. These are readily
available from Zip Products or your local PPG dealer. In this article, we will
show you simple procedures used for dyeing vinyl or plastic items that will give
professional results. So, let's get started!
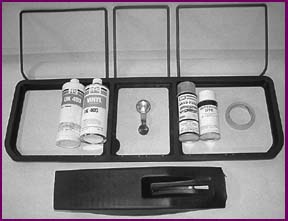 Here are some of the items that we will be dyeing, along with the
products that we'll use. The dye and Sem Sand Free no. 38363 came from Zip
Products. The PPG products came from our local PPG dealer. You may also need
some masking tape and a well-ventilated area to spray the new items.
Here are some of the items that we will be dyeing, along with the
products that we'll use. The dye and Sem Sand Free no. 38363 came from Zip
Products. The PPG products came from our local PPG dealer. You may also need
some masking tape and a well-ventilated area to spray the new items.
The first step in dyeing any vinyl product is to clean it thoroughly with PPG
no. UK403 Vinyl Cleaner to remove any dirt, grease, or grime. Use a nylon
bristle brush or coarse sponge to clean the item, even if it is new. Do this two
or three times. After it is clean, thoroughly rinse it with clean water, and dry
it completely.
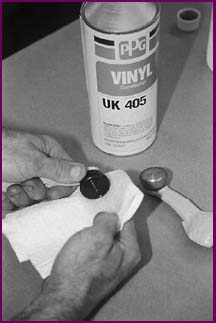
Wipe the item down with PPG no. UK405 Vinyl Conditioner. Use overlapping
strokes and go in one direction only. Do not crisscross or change directions.
After it is done, do not touch it with your bare hands. The oils in your skin
can stick to the vinyl surface and keep the dye from adhering properly.
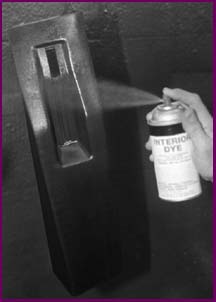 You can now start to spray-dye the item. Work in a
well-ventilated area and use light overlapping strokes. Do not put on heavy
coats because this can cause runs or blushing. (Blushing means the dye will have
a whitish cast and look dull. This is caused by too much paint, and humidity in
the air. It is a good idea not to do any type of dyeing on rainy or high
humidity days.) Allow about 5 to 10 minutes between coats, depending on the
temperature (higher temp equals less time). When it is thoroughly covered, check
it for light spots. If it is covered completely, let it dry about one hour.
After it is dry, it will be ready for installation.
You can now start to spray-dye the item. Work in a
well-ventilated area and use light overlapping strokes. Do not put on heavy
coats because this can cause runs or blushing. (Blushing means the dye will have
a whitish cast and look dull. This is caused by too much paint, and humidity in
the air. It is a good idea not to do any type of dyeing on rainy or high
humidity days.) Allow about 5 to 10 minutes between coats, depending on the
temperature (higher temp equals less time). When it is thoroughly covered, check
it for light spots. If it is covered completely, let it dry about one hour.
After it is dry, it will be ready for installation.
Plastic items are a little different. If they're new, start by
wiping each item with PPG UK405 Vinyl Conditioner. Remember, overlapping strokes
in one direction. Again, don't touch the item with your bare hands. Note: if you
are changing colors on an existing item, or it is a used item, start by
thoroughly cleaning it with PPG UK403 Cleaner first, just like you would if the
item were vinyl. Then go on to the vinyl conditioner.
Now, spray the plastic item with Sem Sand Free no. 38363, available from Zip
Products. This will open the pores of the plastic and allow the dye to
penetrate.

Here is the most important step. Before the Sem Sand Free dries, start to
spray your first color coat on the item. Make sure that you get a complete cover
coat. It only has to be a light cover coat, but it must be over the entire
surface of the item. (Do not allow the Sand Free to dry before you spray the
color coat. If you do, the color coat will not penetrate the plastic, and the
dye or paint will not adhere.) After the first coat has dried, spray light to
medium overlapping coats until the part is covered to your satisfaction. You do
not have to spray any more Sem Sand Free after the first coat. Once is enough.
In the picture, you can see we had both the Sem Sand Free and the dye ready to
spray. Dyeing vinyl or plastic is that simple!
Sources
PPG - Ditzler
See a dealer near you.
Zip Products, Inc.
8067 Fast Lane
Dept. CF
Mechanicsville, VA
23111
(800) 962-9632
Interior Dye
Sem Sand Free no. 38363
The author would like to thank Scott Coral of Greg Donahue Collector Car
Restorations, Inc. for his assistance with this article.

For a complete version of this story in print, look for Corvette
Fever on your local newsstand.


Copyright(c) 1997: Dobbs
Publishing Group.
All rights reserved. Do not duplicate or redistribute
without permission of the publisher.