text and photography by John Pfanstiehl
![]() The clamp bolts on
the tie rod sleeves should be checked for tightness. A close visual examination
of the threads may show evidence of movement.
The clamp bolts on
the tie rod sleeves should be checked for tightness. A close visual examination
of the threads may show evidence of movement.
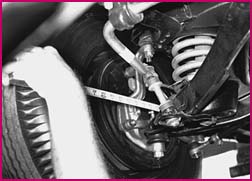
![]() Push up and down
on the idler arm to check for excessive clearance. The original rubber bushed
arms become loose fairly quickly. Replacement arms, which have greaseable
bearings instead of rubber bushings, are much tighter and last indefinitely.
Push up and down
on the idler arm to check for excessive clearance. The original rubber bushed
arms become loose fairly quickly. Replacement arms, which have greaseable
bearings instead of rubber bushings, are much tighter and last indefinitely.
![]() Tighten the four
nuts that attach the power steering cylinder bracket. Don't search for a bolt
head to hold on the top - two plates keep the studs from turning.
Tighten the four
nuts that attach the power steering cylinder bracket. Don't search for a bolt
head to hold on the top - two plates keep the studs from turning.
![]() Examine the power
steering cylinder hoses when the wheels are turned all the way to the right to
make sure the hoses aren't forced into the bracket.
Examine the power
steering cylinder hoses when the wheels are turned all the way to the right to
make sure the hoses aren't forced into the bracket.
![]() Slowly turn the
wheels all the way in both directions to observe the movement of the power
steering pump hoses. They may have been bent or replacements were not properly
adjusted when installed. Check for interference, binding, stretching and
wear.
Slowly turn the
wheels all the way in both directions to observe the movement of the power
steering pump hoses. They may have been bent or replacements were not properly
adjusted when installed. Check for interference, binding, stretching and
wear.
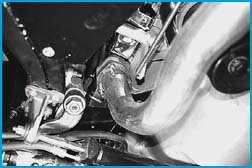
![]() It doesn't hurt to
snug the three nuts on the steering box and check the tightness of the three
nuts on the exhaust manifold. The exhaust has a tendency to loosen up, but
checking the nuts every oil change can prevent the gaskets from blowing out,
which often causes additional damage. Also tighten the bolt that clamps the
power steering valve to the drag link.
It doesn't hurt to
snug the three nuts on the steering box and check the tightness of the three
nuts on the exhaust manifold. The exhaust has a tendency to loosen up, but
checking the nuts every oil change can prevent the gaskets from blowing out,
which often causes additional damage. Also tighten the bolt that clamps the
power steering valve to the drag link.
![]() Look at the bottom
of the steering box but don't be too worried if the pitman shaft and arm are
moist with a little oil or grease. The pitman shaft seal usually seeps a bit and
many of them looked damp when they were new.
Look at the bottom
of the steering box but don't be too worried if the pitman shaft and arm are
moist with a little oil or grease. The pitman shaft seal usually seeps a bit and
many of them looked damp when they were new.
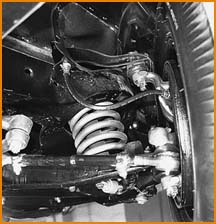
![]() Measure the
distance of the outer end of each lower A-frame from the center crossmember to
determine if a problem exists with the frame or lower suspension components.
Hold one end of a tape measure in the appropriate hole in the crossmember.
Measure the
distance of the outer end of each lower A-frame from the center crossmember to
determine if a problem exists with the frame or lower suspension components.
Hold one end of a tape measure in the appropriate hole in the crossmember.
![]() Pull the tape
measure out and over the top of the lower ball joint. Record the measurement at
the center of the grease fitting and do the same on the other side. If the two
measurements differ by more than 1/4-inch, look for the reason.
Pull the tape
measure out and over the top of the lower ball joint. Record the measurement at
the center of the grease fitting and do the same on the other side. If the two
measurements differ by more than 1/4-inch, look for the reason.
![]() Also measure the
distance between the lower A-frame bushing bolts on both the front and rear
bushings. If the frame bracket or the bushing shaft is bent, the measurement
will be unequal. This is a common result of a hard hit to a Corvette front
wheel.
Also measure the
distance between the lower A-frame bushing bolts on both the front and rear
bushings. If the frame bracket or the bushing shaft is bent, the measurement
will be unequal. This is a common result of a hard hit to a Corvette front
wheel.
![]() Check the outside
of the spring for evidence of rubbing. A shiny area on the coils shows it has
been rubbing against the frame and indicates uncorrected frame or suspension
damage - not at all uncommon with older Corvettes.
Check the outside
of the spring for evidence of rubbing. A shiny area on the coils shows it has
been rubbing against the frame and indicates uncorrected frame or suspension
damage - not at all uncommon with older Corvettes.
![]() The frame bracket
that extends backward to the rear bolt of the lower A-frame has two common
problems. First, it can be bent during collisions, even relatively minor ones.
The measurements taken earlier will test for that. Also, closely inspect the
welds. Look for cracks, rusty edges or other signs of separation or movement
caused by years of stress at this location.
The frame bracket
that extends backward to the rear bolt of the lower A-frame has two common
problems. First, it can be bent during collisions, even relatively minor ones.
The measurements taken earlier will test for that. Also, closely inspect the
welds. Look for cracks, rusty edges or other signs of separation or movement
caused by years of stress at this location.

![]() The section of frame that bends down and out behind the front wheels is one of
the first places to check for evidence of collision damage or repairs. Look for
kinks in the steel, welding, undue undercoating or repainting.
The section of frame that bends down and out behind the front wheels is one of
the first places to check for evidence of collision damage or repairs. Look for
kinks in the steel, welding, undue undercoating or repainting.
![]() The frame
extension in front of the springs deserves a good inspection. It is the portion
of frame most likely to get damaged in a collision. Check the sides of the frame
for straightness and alignment. The mounting of the bumper brackets can also
give a clue as to the car's history and care.
The frame
extension in front of the springs deserves a good inspection. It is the portion
of frame most likely to get damaged in a collision. Check the sides of the frame
for straightness and alignment. The mounting of the bumper brackets can also
give a clue as to the car's history and care.
 Check the rear starter
bolts for tightness. A loose starter can cause ring gear damage on the flywheel,
and the labor to remove the flywheel makes this an expensive repair. Also check
for proper attachment of the ground wire. It is frequently forgotten or attached
to the solenoid. If you have heater blower or windshield wiper problems, look
here.
Check the rear starter
bolts for tightness. A loose starter can cause ring gear damage on the flywheel,
and the labor to remove the flywheel makes this an expensive repair. Also check
for proper attachment of the ground wire. It is frequently forgotten or attached
to the solenoid. If you have heater blower or windshield wiper problems, look
here.
Check the front starter
bracket. If you don't have one, I'd strongly recommend it. I've seen the back of
a friend's original big-block torn off where the starter bolted on because the
starter wasn't securely mounted, and it cocked. Check the condition of the
ground cable, too.
Inspect the rubber on both
motor mounts. When the rubber separates from the steel plates, it allows the
motor to jump up, particularly during hard acceleration. For replacements, buy
the later model "safety" mounts which have strong metal tabs to limit movement
of the motor if the rubber separates.
Wipe away any grease that
is covering the ball stud for the clutch bell crank. The stud has two flats
which allow a thin 5/8-inch open end wrench in to tighten it. With the rotating
action and pressure of the bell crank, this stud is often found loose on
Corvettes.
If the fuel pump and lower
hose are oily, suspect the front main seal. When it leaks, the oil gets slung to
the passenger's side and has caused premature deterioration of many a lower rear
A-frame bushing.
![]() Clearance around
the lower portion of the radiator is often overlooked. If the tank or tubes are
close to any steel parts, the radiator is in danger of being perforated.
Clearance around
the lower portion of the radiator is often overlooked. If the tank or tubes are
close to any steel parts, the radiator is in danger of being perforated.
![]() While inspecting
the front of the car from below, examine the underside of the fiberglass panels
for splices or other repairs. After examining a few original Corvettes, the
proper look of the fiberglass and bonding strips will be apparent.
While inspecting
the front of the car from below, examine the underside of the fiberglass panels
for splices or other repairs. After examining a few original Corvettes, the
proper look of the fiberglass and bonding strips will be apparent.
![]() Look at the brake hose when the wheels are turned all the way to the left and to
the right. During brake repairs, the hose may have been twisted so that it rubs
on the frame as the suspension moves up and down.
Look at the brake hose when the wheels are turned all the way to the left and to
the right. During brake repairs, the hose may have been twisted so that it rubs
on the frame as the suspension moves up and down.
![]() Inspect the
firewall for open holes which were once sealed by rubber plugs or grommets. On
later model cars, rubber plugs were used to attach carpeting and insulation near
the steering column. Also examine the clamp and mounting plate on the lower end
of the steering column.
Inspect the
firewall for open holes which were once sealed by rubber plugs or grommets. On
later model cars, rubber plugs were used to attach carpeting and insulation near
the steering column. Also examine the clamp and mounting plate on the lower end
of the steering column.
 Because it is very common
for them to loosen with use, snug the bolts or nuts on the shift levers. Two
cautions: don't overtighten the nuts and return the levers to their neutral
position after tightening.
Because it is very common
for them to loosen with use, snug the bolts or nuts on the shift levers. Two
cautions: don't overtighten the nuts and return the levers to their neutral
position after tightening.
Although it's a little
harder to reach, tighten the nut on the reverse lever. Also check the reverse
light switch, wires and rod while you're there.
Check the stop nuts on the
shifter rods, too. Now is a good time to adjust the shifter if it hangs up on
the gates when going into or out of reverse.
Use a 9/16-inch box wrench
to tighten the nuts and bolts on the rear bracket. The lower bolt is easiest to
reach, but the upper bolts are usually in need of attention, too. The bracket on
later model Corvettes is a little different but it loosens up just as often.
Use a 5/8-inch wrench or
socket to tighten the rear mount bolts, both the pair going into the mount and
the pair going into the transmission's rear case.
Check the transmission to
bellhousing bolts - the right 3/4-inch box wrench can get onto all four. Each
bolt should have a large lock washer.
The exhaust bracket came in
one size for the 2-inch pipes and one for the 2-1/2-inch pipes. If the curve
doesn't match the pipe, the wrong bracket may have been installed. Originally
only one clamp was used on each pipe, but it's not uncommon to find that a
second clamp was added to reduce exhaust leakage.
Look at the positioning of
the exhaust pipes as they go through the frame. If they are not centered, the
pipes can rattle and knock against the frame as the motor vibrates. With good
lighting, this view also permits inspection of the transmission real seal. Push
up and down on the front of the driveshaft to check for an excessively loose
tailshaft bushing.
-John Pfanstiehl is a contributing editor to Corvette Fever and is author of the new Corvette Weekend Projects by HP Books.
Author's Note: Thanks to John Dubois of VanSteel Mint Restorations, 1141 Court St., Clearwater, FL 34616 for the use of his lift and his 1964 coupe for many of these photos.